Homemade what? Yes marshmallows. I am not sure what prompted me to try this a few years ago but I am really glad for what ever it was. Now you may think that marshmallows are a daunting task but to be honest it is incredibly easy and doesn’t take long. The worst part of the process is waiting over night for them to set up and dry. This is an excellent gift item for co-workers; Christmas mug from the local department store (99 cents), either home made cocoa mix or a nice individual package (99 cents – $2) and your marshmallows.
Ingredients
3 pouches of non-flavored KNOX gelatin
1 Cup of Light Corn Syrup
1 Cup of cold water divided
2 Cups of sugar
1 teaspoon vanilla (one receipe I read called for more, others less – make them how you like)
1/4 teaspoon of salt
Crisco – to prepare your pan
powder sugar for dusting
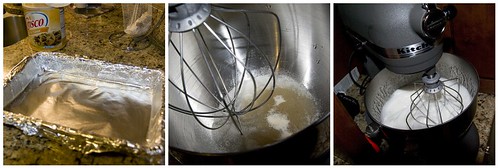
Start by lining your 9×13 pan with aluminum foil. I have seen many recommendations and have tried several foil is the best. Coat the bottom and sides of your lined pan with Crisco, now toss in a couple spoons full of powder sugar and roll around to coat. Feels familiar doesn’t it? Place 1/2 cup of water, salt, corn syrup and sugar in a heavy sauce pan over medium heat. Stir regularly (constant isn’t necessary) until dissolved. While you are waiting put the other 1/2 a cup of cold water in to the mixer bowl and sprinkle the gelatin over it. Once the syrup mix is ready to boil cover and cook for 3 minutes. Remove the lid, raise the heat and cook with minimal stirring until it reaches 238-240 degrees. Here is the hardest part of the entire process. After fuel cut off, slowly pour the syrup into the mixing bowl with your whisk attachment on a low – med speed. This is hard, that pan is stinking heavy and HOT so be careful and don’t burn yourself. Once this is all incorporated you can stop the mixer and scrape the sides a few times. Beat this mixture on WARP speed until it becomes white, fluffy and resembles a jar of fluff. Add the vanilla here at the end and mix till incorporated. The mixture should still be lukewarm. I have beat this too long and it just makes it harder to spread in the pan. I have beat it a little under and found that it levels out in the pan easier.
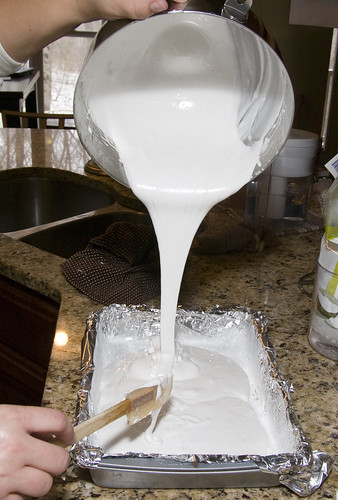
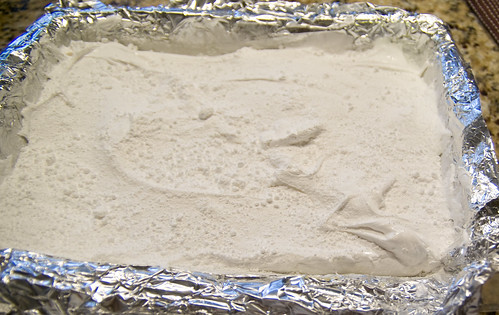
Spread this mixture into your prepared pan, use a spatula to move it around and push into the corners. Sprinkle with a nice dusting of powder sugar. Now the second hardest part, waiting till tomorrow.
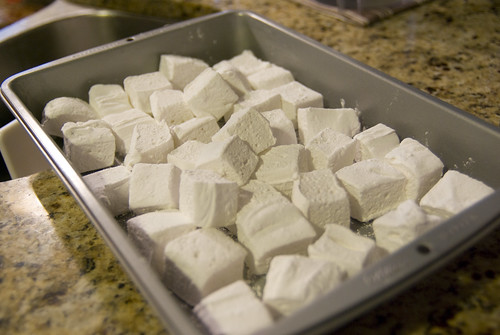
Is it tomorrow yet? Well of course it doesn’t matter this is the magic of the interwebs. 🙂 Pull the foil out of the pan marshmallows and all. Use your fingers to pull the edges away from the foil all the way around until you can pick up the entire sheet and place on a cutting board. Now you can cut them into what ever size and shape of marshmallows you’d like. I prefer to use my pizza rocker, it makes quick work of cutting these. To keep them from sticking toss the cut pieces in powdered sugar to coat the newly cut exposed edges, otherwise they are really sticky. I generally let them sit out exposed to the air for a bit. For the ones I keep for myself I cut some small cubes to use in hot chocolate and I leave some much larger ones to use in smores. ENJOY!!!!
A note from my trusty taste testers and general kitchen help. “these are good mom! also what is this and why is it stuck to our face?”

wow – cool! Do you refrigerate them overnight, or just leave them at room temp? I am thinking that you could also make some awesome rice crispy treats with the mixture at the step where you would pour them into the pan to set?